Showing posts with label homeschool. Show all posts

Tuesday, April 19, 2011

Some Writing from Indi

I'd just like to document a bit of Indi's literacy journey, as crude as it may be. I'm terribly disorganised (which I'm pretty sure is an unschooling family's prerogative) so I think I should at least start photographing and trying to blog about our little adventure in learning-without-schooling. It's pretty likely that these documents will go missing in the massive pile of 'stuff to sort through' but at least I'll have a digital version now :)


This one is from a few months ago. Mostly copy work and asking 'how do I spell ...' 


She copied these from reading eggs about a month ago. We have a couple of phonic-based programs on the computer and the iphone that she is free to use as she pleases.


This was from last week. She was nagging me about making a cake and wanted to make sure we had all the ingredients. Flour, eggs, milk, custard, cake, cupcakes. 


This was thrown at me a few days ago. For those not fluent in inventive spelling, it reads: 
Mum. I love you so much but I wish we could go on holidays. 
(Me too baby girl ;) )

She has also started reading everything in sight; street signs, food labels, catalogues etc. 
We have been reading some books together, just the regular simple beginner books, Fat Cat and that sort of thing. 
We also found a couple of Dr. Suess books in a second hand shop today (who get's rid of Dr. Suess, honestly?! One of them was even in the freebie bin!) and tonight she read a few pages from 'Ten Apples Up On Top!' which we have never read before so I know she actually read it and didn't just repeat from memory. WOW! 


Monday, March 14, 2011

Today's Classroom

Indi practicing her writing in the sand


Tuesday, March 8, 2011

While we were feeding the guinea pigs last night, Indi noticed different types of seed in their food and decided she wanted to plant some. One type were sunflower seeds but we have no idea what the other type are. She is really keen on writing and sounding out words at the moment so I suggested she write down some info about it. She wrote the day and date, and the type of seeds she planted. Because we didn't know what the seeds were, she wrote down a description of them.

Indi raked away all the mulch she'd spread a few months ago and pulled up the remains of the corn stalks and most of the weeds. She was happy to find a Jade plant growing from a snapped branch that she'd chucked on the ground.

Planting the sunflower seeds along the wire fence

Planting the other seeds in a row behind

Watering

Once she'd planted and watered, Indi drew a map of her garden and marked in where she'd planted the seeds so she'd remember not to step on them (this was interspersed with yells of abuse at the dog who decided to tramp all over her freshly watered beds!)


Thursday, January 20, 2011

Tiny Winged Creatures ...

Or at least they will be in a few more weeks :)

Check them out, destroying a lime tree


These fantastic little creatures are Papilio aegeus, caterpillars of the Citrus Swallowtail Butterfly. We discovered them on a lime tree that's been sitting out the front for months (I sort of forgot to plant it and it got shoved into the corner behind some other pots).
The one on the right in the top photo has just begun to pupate. Apparently they take anywhere from one to six months to emerge, so you'll have to wait a bit longer for those pictures!
We remodelled Indi's butterfly enclosure to contain them, which we made from a camping mosquito net.


Notice the lack of leaves on the poor old lime tree LOL!
This butterfly house has been loads of fun for us this summer. Mostly we've just hatched cabbage white butterflies because there are so many of the hungry little buggers hanging around the cabbages!

Indi also made this little booklet about the life cycle of the butterfly


She has also added words like 'pupae' and 'proboscis' to her vocabulary :)
If you want to see a picture of these butterflies, this website here is excellent. We use it all the time to identify creepers that we find about the garden.

Wednesday, June 16, 2010

Solstice Lanterns

Next monday is the Winter Solstice in the Southern Hemisphere. For those who don't know, the Winter Solstice marks midwinter; the shortest day and longest night of the year.
From a Pagan viewpoint, the Winter Solstice represents the rebirth of the Lord, the Sun, in the eternal cycle. It signifies the end of the darkness, as the days slowly but surely get longer and life returns as the Earth once again is warmed.

Of all the things I miss about living on the North Coast, I think the Winter Solstice Lantern Parade rates the highest. Every year on the Solstice we would line the streets of Lismore to watch the beautiful spectacle parade down the main streets. The whole community was involved; school kids, local charities, groups and businesses. Everyone carried a lantern, ranging from small triangular lanterns decorated by little school kids, to huge dragons and Unicorns and earth mothers, some taking three or four people to carry them! The groups would be interspersed with different bands and musicians creating a celebratory atmosphere.
We'd follow the procession down through the town to the river, where a spectacular firey finale would await. Indi was only a baby the first time we went, but I still remember that awe-filled look in her eyes at the fireworks. Once the smoke had cleared, everyone strolled back into town to celebrate with a street party with market stalls, food, street entertainers and of course music!

So, in leiu of such a warming event, I've decided to create some little lanterns of our own to welcome the return of the sun.
I've used the Star Lantern Tutorial from CHILDHOOD MAGIC to create these lanterns (thankyou Ariella!)


First we painted the circles. We just used cheapo water paints.


Here are the finished designs. I painted both sides of mine (the red spiral one and the central sun/flower one), but Indi only painted one side of hers (the rainbow serpent-looking one). She decided that catching lizards basking in the winter sun was more exciting than painting!


Once the paint was dry, we painted the paper with olive oil to make it translucent. I did this on newspaper to minimise mess. We painted both sides of the circles (ideally, we'd have sourced some proper translucent paper, but what can I say ... I'm disorganised, a cheapskate, and I like a challenge!)


Blot off the excess oil as best you can, then hang them somewhere inside to dry a bit.


Once they are dry(-ish) it is time to fold! The actual folding part was bit tricky for Indi (almost 5), but she enjoyed watching. She took the job of cutting the edges off the circle to make it an octagon.


About halfway through. I can appreciate how origami is such an addictive pastime :)  


And here is the end result!


I have to get some electric candles to light them up for our weekend solstice celebration; real candles will be too dangerous considering that they are paper soaked in oil!
BUT I'm terribly impatient and just couldn't wait to see what they'd look like lit up ...
So I snuck outside with a candle and the camera while the kids were playing with Craig ...


Beautiful, don't you think?

Friday, June 4, 2010

Salt Dough

Another rainy day... another day of inside play.

Today we made some salt dough figurines. Here's how we did it ...

One cup of salt

Two cups of plain flour

Mix them together in a bowl

Add one cup of water, a little at a time, and mix with a knife until it's workable enough to knead. Knead the dough until it is smooth and consistent.

Create!

The best thing about this craft is that Keanu could join in too. Indi always wants to do things that are a bit above Keanu's capabilities, so it's nice to find something that we could all enjoy. 

Here are our final designs ...

Indi made the horse herself and we made the mermaid together. We used the garlic crusher to make the hair and mane. The other one is a 'cookie' with sprinkles on top.

We baked them in the oven at about 100 degrees Celcius. They took 2 hours! I don't think the cookie is even hard through to the middle. Next time we might have to make them a bit thinner!


We did plan on painting them this afternoon when Keanu was asleep, but I guess it was just too much excitement for Miss Indi, because she has slept all afternoon too!

Tuesday, June 1, 2010

Brrrrrrrr! An Update from Coolsville ;)


It's cold and wet and windy and we've been stuck inside for days. The wet washing is threatening to rise up and overtake the house and the kids are going a little bit crazy because we haven't been outside to play.
We've been staying in bed later and later and then we need to turn the lights on early in the afternoon because it's so dark.

Certainly not weather conducive to gardening! I managed to get out the back today for a short time in between the rain. It's so wet! The poor vegies look like they're about to float away.
It's too wet to plant anything unfortunately. Over the last few weeks I've been gifted lots of plants; a couple of avocado trees, some raspberries, a red cordyline, not to mention my broccoli seedlings that are patiently waiting to go in the ground, the pineapple tops that we sprouted still sitting on the kitchen bench and the poor lime trees that have been sitting miserably in their pots for way too long.

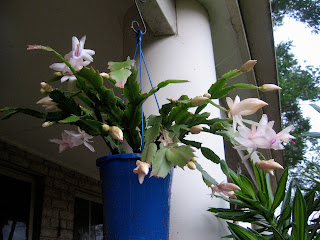
On a bright note, the zygo cactus' have started to flower. What beautiful intricate flowers to put some colour into the grey days!


And some jonquil bulbs from a friend last year have popped their little green heads up.


On the craft front: lots has been happening. One thing I do like about the cold weather; snuggling up with a crochet hook and loads of yarn! I've jumped on the Ravelry bandwagon so have loads of inspiration. This coupled with the fact that I was gifted loads of gorgeous yarn for my birthday on Monday has led to lots of projects being started.

Not a lot to report on the homeschool front. We were doing a lot of outside activities but the weather has put a stop on Indi's garden for the time being. The closest we've been to outside education is digging up worms to feed to Nim.
She has been very interested in earth sciences lately. We've been reading a book about the universe and our planet. I picked this book up in a second-hand shop a while ago (I have an addiction to those 70's style kiddie encyclopaedias ;) ) and it's been very useful.

Today we read and talked about how the earth spins on it's axis, creating day and night. Indi deduced that even though it's night time here, it's daytime on the other side of the earth. I showed her how the axis is tilted and, as the earth revolves around the sun, this is what causes the weather to change throughout the year. We also looked at how the moon 'changes' shape and why it does so. If this cloudy weather ever buggers off I'd like to create a moon calendar with her.

And finally, an update on the guinea pigs.
I'm sad to say that we lost another baby :( so just one little fella left. Worse still, one of my males died aswell. Just like Bali; he seemed fine in the morning when I went out and fed them but was dead by the afternoon :( .
The little baby seems to be doing great though. I still have him inside with Jazzy; he's very vocal and scampers around and eats with gusto, so I really hope he's going to be ok.

Wednesday, May 5, 2010

The Budding Entomologist

The problem: An old leaky fishtank, a bug-crazy daughter and a mamma getting a wee bit tired of finding snails all over the house.

The solution: Build a snail terrarium!

A quick Google search to find out what snails require.

An old fishtank with a crack in the bottom, former home of Crabby Labby, RIP.

A layer of soil, about 4cm deep. 

Next some greenery, for food and shelter. 

Snails like dandelion leaves, which are abundant in our front lawn! We also picked leaves from the plants where we most likely find snails. 

And in with the snails! 


Friday, April 30, 2010

A Planting Tutorial by Indi

How to plant dwarf butter beans in your garden...

Step 1. Admire the colour and texture of the beans that look like little black beetles.

Step 2. Poke holes in the ground. Nothing quite like the feeling of dirt under your fingernails.

Step 3. Drop a shiny bean into the hole.

Step 4. Firm the soil down.

Step 5. Water well, and wait for the bean shoots to pop their little green heads out of the soil. Be sure and check every few minutes of the day ;)

Thankyou, Indi.